Pumpkins are so iconic of Halloween that you can’t help trying to squeeze them into your lessons whenever you can. This kindergarten teacher had the students sponge paint paper bags orange, stuff them with newspaper and make a pumpkin patch on their bulletin board. For older (yet still young) kids, you could write adjectives that describe pumpkins on the bag after it’s painted to integrate some language study.

Category Archives: Art/Crafts
Halloween Art Project: Picasso’s Frankenstein
When I saw this the other day in a third grade classroom, I just had to snap a photo. What a cute idea to make a Frankenstein in the style of Pablo Picasso! After looking at examples of Picasso’s work, students used construction paper, scissors and glue to create their own version of Frankenstein. Awesome!
Like what you see? Help support this blog of entirely free stuff for teachers by sharing it with your friends! Thanks!
3D Snowflakes! (Easy Step-by-Step Directions)
You’ve probably seen those really cool 3D snowflakes. Maybe you thought they looked really complicated. Not true!! Here are my simple, step-by-step directions: click here.
Movement Maps (Lesson Plan)
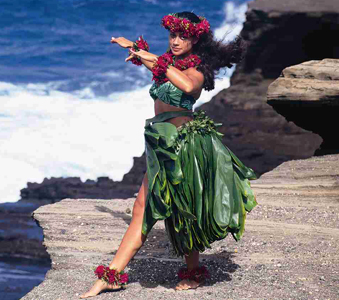
Art can be a great way to incorporate culture into a classroom. Check out this lesson that you can incorporate a bit of Polynesian culture into your classroom…
Lesson Overview:
Students learn to make connections between visual art and movement. They will learn about basic art distinctions of line, create guided movement that simulates different types of lines, create gesture drawings, and make movement maps based on their gesture drawings.
Length of Lesson:
Three 45-minute class periods
Notes:
This lesson is particularly suitable for Grade 5, but can be used with some adaptation for Grades 3-4.
Instructional Objectives:
Students will:
- learn about line as an element of art.
- learn about line as an element of form and movement.
- create gesture drawings using different types of lines.
- create movement maps, based upon their gesture drawings, that use a combination of lines and different levels.
- perform their movement maps in small groups.
Supplies:
- Pencils
- 18″ x 12″ newsprint paper
- Chalk board and chalk
- Paper
- Video of traditional hula dancing
Instructional Plan:
Warm Up
Draw a straight line on the board. Ask for examples of things that move in a straight line (sidewalks, streets, skateboards, cars, bicycles, etc.). Draw a curvy line and ask students for examples of things that move in a curving manner (sea shells, jet skis, waves, trick planes, roller coasters, etc.) Engage students in discussion about different types of lines – straight, curved, angular, etc. Point out straight and curved lines in the space. (Not necessarily inside a classroom).
Guided Activity:
Have students stand and move in straight, curved, and angular pathways as you call out, using music (5 minutes). Add changing directions (forward, sideways, backwards). Tell students that there should be clear contrasts between straight, curved, and angular pathways. Students should be aware of how much space they are using. Engage students in brief discussion about their movement pathways.
Explain the meaning of “gesture drawing” to students. Basically, gesture drawing is a method of training the hand to capture overall form, not the details; a quick (only 15-30 seconds), focused approach is best. Explain to students that erasing is not allowed; it breaks focus and is a waste of time. Distribute 3-4 sheets of 18″ X 12″ newsprint paper and pencils to each student. Explain to students that they will do several brief exercises about gesture drawing.
Exercise #1: Straight Lines
- Have students fill one 18″ x 12″ paper with straight lines only. The lines can be horizontal, vertical, or diagonal. Encourage students to fill the entire piece of paper.
- Play 1 minutes of traditional hula dancing. Have students look for straight lines the dancer makes with her body. Ask students to demonstrate the straight lines with their own bodies and explain to a partner how there are straight lines in the movements.
Exercise #2: Curved Lines
- Have students fill one paper with curved lines only. The lines can be positioned vertically, horizontally, or diagonally. Encourage students to fill the entire sheet of paper.
- Play 1 minutes of traditional hula dancing. Have students look for straight lines the dancer makes with her body. Ask students to demonstrate the curved lines with their own bodies and explain to a partner how there are curved lines in the movements.
Independent Activity
Have students display their drawings in front of them. Ask students what types of lines they see in their drawings – broken or intermittent, zig-zag, spiral, etc.? Are some lines thick, while others are thin? Explain to students that they will now create a drawing, using straight and curved lines, that will be a design for their next activity, a “movement map”. As students work, walk around the room offering feedback and suggestions. Encourage students to incorporate types of lines previously discussed in class.
Once students have completed their movement maps, put them in small groups of 4-6 students each. Students in each group should share their maps with the group. Ask each group to use their maps to move through the space. Give each group about 5 minutes to try their maps.
Explain to students that they will now add levels – high, middle, and low – to their maps. Encourage them to discuss within their groups the logistics of performing their maps with levels. Allow students some time to decide on what level to use, and to discuss their maps with their group. Give each group about 5 minutes to try out their movement maps.
Closure:
Have each student label their map with their name, and collect the maps. Engage students in discussion about the connections between the element of line in art and the element of line in movement. Ask students about their movement maps – what levels were more difficult to travel through? Did the type of lines in a map affect the level of movement? Why or why not? Did they discover some ways to travel with their bodies that they had not discovered before?
Assessment:
You may use the Assessment Rubric to evaluate student learning. Evaluation in movement curriculum is primarily based on participation. You may wish to evaluate students’ attitude and participation as separate areas.
Unique Contributions of the Arts
- Culture –Culture encompasses all of the values, themes and activities that are important to a croup of people. By retaining, studying and expressing culture, students can strengthen their core knowledge of who they are. Educators can help children learn about themselves and the world around them by teaching culture through the arts.
- Competence/Control- Being able to control your emotions, thoughts and actions is a crucial skill that children need to succeed and be happy in life. As teachers, we can help students comprehend what is right and wrong in their thoughts, emotions and actions so they can maintain control and enjoy life. The arts teach control in a more effective way than most other disciplines.
- Communication-Communication is crucial in today’s society, not only for individuals, but for he world as a whole. The arts help students explore different ways of communicating a message to others, but students can have fun while doing so.
- Cooperation/Collaboration- Collaboration and cooperation help our world problem-solve and improve situations. It is crucial that students learn the value of working as a team to accomplish a single goal. The arts require multiple areas of skill, which com from many people. This requirement to work together to produce a beautiful piece of art can help teach students that people need each other and that all have something to contribute to life.
- Confidence- Confidence is empowering; it is what tells us we can go on when we get shaky. Confidence helps us accomplish things we thought we could never do. Teachers can instill in children confidence that will then lead them to accomplish great things. The opportunity to give this gift to a children is a blessing and teachers should help students develop self confidence every moment in the classroom.
Developmental Stages of Art
When young children are given a crayon and paper, they usually scribble in imitation of others. Eventually these “drawings” take on meaning as children develop artistically. There are 3 basic developmental stages of art: scribbles, first representational forms, and more realistic drawings. In the scribble stage, the intent of the drawing is contained in the child’s gestures and explanation, rather than in the actual markings. The article gives the example of an 18-month-old girl who took her crayon and hopped it around the page rather than actually drawing a picture of a bunny hopping. Children are not yet able to draw what they are thinking and often need to explain or demonstrate what they mean to draw.
The second stage of first representational forms usually starts around age 3, when children’s scribbles become drawings. This often happens when children gesture or scribble something and then realize that it looks similar to a real thing and decide to label it. For example, a child referenced in the article noticed that their scribbles look liked a real object (noodles) and then called his picture chicken pie and noodles. However, very few three year olds draw things that others can tell what their picture stands for. This improves when children hit one of the most important milestones in drawing: using lines to denote boundaries of objects. This leads to the first drawings of people, even though they are the simplest form that still looks like a human. Children’s first representations often contain a circle with lines attached. Four year olds will then add details such as eyes, hands, mouths and feet.
The third stage is more realistic drawings. As fine motor skills improve, children can create more complex drawings. Five and six year olds draw people with distinct arms and legs, rather than the “universal tadpole body” that three and four year olds draw. Older preschool children soon start exploring with depth, proportion, and overlapping objects. As children improve their drawing skills, their creations become more recognizable and teachers can start implementing various art techniques. Understanding the developmental stages children go through is important so that teachers can teach age-appropriate skills and encourage children to enjoy art.


