Educational Psychology: Theories

There have been many studies and theorists who analyse psychology’s role in education. Here’s a review of are 3 of the big ones.

Behaviorism
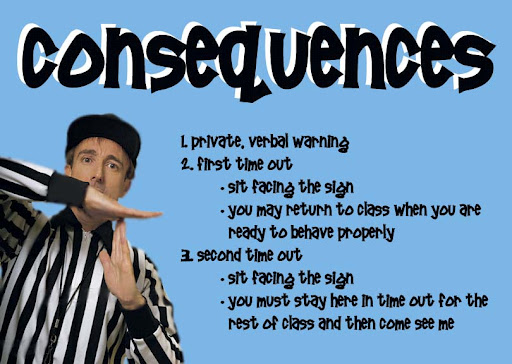
Key Ideas. Behaviorism is a very task-oriented school of thought. This theory focuses on classical conditioning, like in the example of Pavlov’s dogs. Students need to be conditioned to know what to do when presented with a certain stimulus (Wong). There are many specific ideas within this concept. Teachers must understand your students’ culture to succeed in classroom management, connect with their students and communicate with them (Gordon). For management purposes, teachers should know who causes disturbances and knowing how to deal with multiple disturbances at time (Gordon). Many teachers do not expose themselves to adolescent culture. It is important to do so to be familiar with student trends, but it is crucial that teachers do not embrace the adolescent culture. Teachers need to remain authority figures, not peers to their students (Gordon). Harry Wong advises teachers to explain, reinforce and rehearse classroom with their students every day. Teachers should have both specific and general rules that are posted and can be altered to fit the class (Wong). Successful classroom management plans also include a rewards and penalties system. When teachers see a violation of class rules, they should immediately issue the consequence, without stopping class instruction. Behaviorism is a structured and effective school of though.
Application for Teaching. This theory is very applicable in elementary school classrooms. Gordon advises teachers to find out the background and culture of students to be able to relate to them. In addition, teachers should be in control of their classroom by identifying students that are likely to cause disturbances so that they can prevent these interruptions. Gordon also recommends that instructors give students a solution to work towards and then go help other groups when dealing with multiple disturbances at the same time.


Constructivism
Key Ideas. Constructivism is based on the concept of children learning by adding new information to what that they already know (Constructivist). Constructivism in teaching addresses many different learning styles. Teachers should connect what they are teaching into what students know, care about and what is going on in their lives them. Constructivists emphasize teaching both the whole and parts to children and create an uplifting atmosphere for student learning. Learning Point Associates also stress the importance of learning by experience and hands-on activities. Children should be able to express learning preferences and choose learning activities based on their individual learning style. According to Constructivist thought, an Ideal classroom environment is one that promotes deep understanding. Alie Kohn identifies excitement about learning and social and intellectual growth as a key component to teaching as well. Student involvement in the classroom is crucial and students must play and active role in the classroom management plans (Kohn). Rather than doing things to students, instructors should do activities with students. The constructivist approach is more student-centered than teacher-centered, where teachers only assist in student learning.
Applications for Teaching. To implement this theory in classrooms, teachers should make sure their classroom is a “Learner-Centered” environment, with comfortable areas for working, student work on the walls and good teacher presence (Kohn). Teachers should work to understand the concepts behind student learning, s that they will be better able to assist in student exploration (Glasser). Teachers should give students options in their learning, thus allowing students to consider their own learning preferences and decide for themselves the most effective and engaging learning activities. Although this takes more teacher preparation and flexibility, it is very effective for students.

Moderate
Key Ideas.  The moderate view is the middle ground between the Behaviorist and Constructivist views. According to this view, teachers should ask students questions and let them come up with solutions (Fay & Funk). In addition, teachers should hold their students to high standards of behavior and have consequences that deal with the offense. Management plans should enforceable limits, provide choices within limits, and apply consequences with empathy (Fay & Funk). Leaning towards Constructivism, teachers must ensure that every option students can choose from is a good one. Teachers should also allow children to think for themselves and assist in discovery within the classroom management plan. In order for students to really change their behavior to align with the classroom management plan, they must have an internal change (Fay & Funk). This is more likely to happen if students understand the reasons for each component of the plan and feel that the teacher is implementing these policies out of love; for any action effective, it must be delivered with genuine passion and empathy (Practicing).
Application for Teaching. Teachers should oversee student learning, but not force it. Instructors should ask questions that lead to discovery instead of giving answers to students’ questions (Fay & Funk). Teachers should share expectations with their students and not settle for less than the best from each student. Fay & Funk also identified the importance of letting students make decisions (complying with rules, classroom and lunch activities, etc.).
References
Constructivist Teaching and Learning Models. Learning Point Associates. Retrieved Feb. 6 2008.             <http://www.ncrel.org/sdrs/areas/issues/envrnmnt/drugfree/sa3const.htm&gt;
Fay, J. & Funk, D. (1995). Teaching with Love and Logic. Loveand Logic Press Golden, CO.
Glasser, W. (1997). A new look at school failure and school success. Phi Delta Kappan:78.
Gordon, R.L. (1997). How novice teachers can succeed with adolescents. Educational Leadership (54(7), 56-58).
Practicing Love and Logic Can Mean Happier Schools. Retrieved Feb. 6, 2008. <www.education-world.com

Educational Psychology: Behaviorism

I recently read an article on the behaviorist theory. It was a good review from my Educational Psychology class in college. Here were some highlights:
1)      Key Ideas:
a.       You must understand your students’ culture to succeed in classroom management.
b.      You must understand your student’s culture to be able to connect with them.
c.       You need to know your students  – who causes disturbances, be able to handle more than one disturbance at a time. 
d.      You must be able to communicate and be “in touch” with your students. 
e.      Teachers need to expose themselves to adolescent culture (but they don’t need to embrace it, meaning become it as well). 
f.        Affirm students excitement for particular events (may cause a lack of concentration…)
g.       Relate content to students’ outside interests.
h.      Know your students.
i.         Share your humanity with your students.
2)      Application for Teaching:
a.       Find out what where your students are from, their home background, what is most important to them, what culture are you surrounded by at the school and in the community…
b.      You need to understand what is important to your students and what they connect with, what role do you take in their culture (their parents view), etc.
c.       Be in control of your classroom by knowing which students will cause disturbances so that you can stop them before they become a problem.  Give students a solution to work towards and then go help another group of students if there is more than one disturbance at the same time.
d.      Use terms that they understand and that are personally meaningful to them.
e.      You can be aware of new movies, books, music, activities, fashions going on, but do not need to become exactly like one of the students (you are their teacher, not their peer).
f.        Find out what activities are going on in the school and if at all possible try to focus that excitement for the event in class (apply what you are teaching to their situation).  Be excited with students.
g.       Find out what your students really enjoy and then draw on their experiences and knowledge from that to help connect content to them.  They can even help teach according to their interest.
h.      Each individual child is different, find out what makes them unique.  What do they respond well to.
i.         Let your students get to know you and have fun with them as well.
3)      Reaction: (Agree, Disagree, Questions):
a.       I agree with this whole heartedly because you have to understand what is important to your students and try to see the why behind their behavior before you can understand what is most important to them and what they really need.
b.      It depends what you are teaching and how you are trying to teach.
c.       This will avoid problems before they even have a chance to occur.
d.      Students need to have a good relationship with you to care enough about what you are saying
e.      You need to be able to understand and draw upon the students lives and culture, but you cannot become totally apart of it or they will not have the same respect for you.
f.        Students will see how much you care and be able to focus better when their excitement is acknowledged.
g.       Students will relate what they are learning and care a lot more about what they are learning if what they are learning has to do with something they really love.
h.      If you know your students you will be able to relate the lesson to them and know how to best help them as individuals. 
i.         As students get to know you they will see you as a real person and not just an authoritarian figure.

Gordon R.L. (1997) How novice teachers can succeed with adolescents. Educational Leadership (54(7), 56-58).


Movement Maps (Lesson Plan)

Art can be a great way to incorporate culture into a classroom. Check out this lesson that you can incorporate a bit of Polynesian culture into your classroom…

Movement Maps

Lesson Overview:

Students learn to make connections between visual art and movement. They will learn about basic art distinctions of line, create guided movement that simulates different types of lines, create gesture drawings, and make movement maps based on their gesture drawings.

Length of Lesson:

Three 45-minute class periods

Notes:

This lesson is particularly suitable for Grade 5, but can be used with some adaptation for Grades 3-4.

Instructional Objectives:

Students will:

  • learn about line as an element of art.
  • learn about line as an element of form and movement.
  • create gesture drawings using different types of lines.
  • create movement maps, based upon their gesture drawings, that use a combination of lines and different levels.
  • perform their movement maps in small groups.

Supplies:

  • Pencils
  • 18″ x 12″ newsprint paper
  • Chalk board and chalk
  • Paper
  • Video of traditional hula dancing

Instructional Plan:

Warm Up

Draw a straight line on the board. Ask for examples of things that move in a straight line (sidewalks, streets, skateboards, cars, bicycles, etc.). Draw a curvy line and ask students for examples of things that move in a curving manner (sea shells, jet skis, waves, trick planes, roller coasters, etc.) Engage students in discussion about different types of lines – straight, curved, angular, etc. Point out straight and curved lines in the space. (Not necessarily inside a classroom).

Guided Activity:
Have students stand and move in straight, curved, and angular pathways as you call out, using music  (5 minutes). Add changing directions (forward, sideways, backwards). Tell students that there should be clear contrasts between straight, curved, and angular pathways. Students should be aware of how much space they are using. Engage students in brief discussion about their movement pathways.
Explain the meaning of “gesture drawing” to students. Basically, gesture drawing is a method of training the hand to capture overall form, not the details; a quick (only 15-30 seconds), focused approach is best. Explain to students that erasing is not allowed; it breaks focus and is a waste of time. Distribute 3-4 sheets of 18″ X 12″ newsprint paper and pencils to each student. Explain to students that they will do several brief exercises about gesture drawing.
Exercise #1: Straight Lines

  • Have students fill one 18″ x 12″ paper with straight lines only. The lines can be horizontal, vertical, or diagonal. Encourage students to fill the entire piece of paper.
  • Play 1 minutes of traditional hula dancing. Have students look for straight lines the dancer makes with her body. Ask students to demonstrate the straight lines with their own bodies and explain to a partner how there are straight lines in the movements.

Exercise #2: Curved Lines

  • Have students fill one paper with curved lines only. The lines can be positioned vertically, horizontally, or diagonally. Encourage students to fill the entire sheet of paper.
  • Play 1 minutes of traditional hula dancing. Have students look for straight lines the dancer makes with her body. Ask students to demonstrate the curved lines with their own bodies and explain to a partner how there are curved lines in the movements.
Independent Activity

Have students display their drawings in front of them. Ask students what types of lines they see in their drawings – broken or intermittent, zig-zag, spiral, etc.? Are some lines thick, while others are thin? Explain to students that they will now create a drawing, using straight and curved lines, that will be a design for their next activity, a “movement map”. As students work, walk around the room offering feedback and suggestions. Encourage students to incorporate types of lines previously discussed in class.
Once students have completed their movement maps, put them in small groups of 4-6 students each. Students in each group should share their maps with the group. Ask each group to use their maps to move through the space. Give each group about 5 minutes to try their maps.
Explain to students that they will now add levels – high, middle, and low – to their maps. Encourage them to discuss within their groups the logistics of performing their maps with levels. Allow students some time to decide on what level to use, and to discuss their maps with their group. Give each group about 5 minutes to try out their movement maps.

Closure:

Have each student label their map with their name, and collect the maps. Engage students in discussion about the connections between the element of line in art and the element of line in movement. Ask students about their movement maps – what levels were more difficult to travel through? Did the type of lines in a map affect the level of movement? Why or why not? Did they discover some ways to travel with their bodies that they had not discovered before?

Assessment:

You may use the Assessment Rubric to evaluate student learning. Evaluation in movement curriculum is primarily based on participation. You may wish to evaluate students’ attitude and participation as separate areas. 

Lesson Planning with Multicultural Students in Mind

Diversity  makes classrooms beautiful. This diversity, however, requires careful thought and attention in lesson planning. Here’s an example of planning a lesson with a multicultural student (Erica) in mind…


Context
Name: XXXXXXX                            Date: March 18, 2009                      Grade level: 3rd           
Subject/topic: Contractions                 Length/minutes: 20-30 minutes          Group size: whole class
Sequence: ongoing
Purpose
Standard/core: Utah Standard 8, objective 4, indicator a
Standard 8 Writing-Students write daily to communicate effectively for a variety of purposes and audiences.
Objective 4. Edit written draft for conventions.
a. Edit writing for correct capitalization and punctuation (i.e., capitals in holidays, titles, dates, greetings and closings of letters, personal titles, contractions, abbreviations).
Learning goal: Students will understand how to form contractions with the word not.
Erica is a high energy student who is constantly moving in her seat. Her family speaks Spanish at home, making English her second language (ELL student). Her English language skills are basic and her verbal language is stronger than her written. Knowing where the apostrophe belongs in contractions may pose a problem. In addition, she learns best with kinesthetic activities. Her favorite part of school is PE and is always the first one in line for recess. This lesson deals with contractions, a requirement for the Utah3rd grade state core.
Major concepts:
Contraction: a shortened form of two words; making two words into one.
Apostrophe: shows where letters have been taken out (in most contractions with not, it takes the place of O.) (Make sure to review what the word “contraction” means and what it looks like.)
Contractions:  is not – isn’t                       are not – aren’t                    was not – wasn’t         
were not – weren’t                        have not – haven’t               has not – hasn’t
had not – hadn’t                do not – don’t                      does not – doesn’t            did not – didn’t            
             
will not – won’t   apostrophe takes out two letters: n and o.
cannot – can’t      apostrophe- three letters disappear an the o changes position
Assessment
Given a worksheet, students will be able to write the correct contraction form of the word with 80% accuracy.  
Management
Self starter: none
Expectations: Sit and raise hands (no calling out) even when on the carpet; Students will focus on the topic; No sharpening pencils, getting out of seats going to the bathroom during the lesson.
Procedures: work with your table buddy; raise hands to speak.
Fast finisher: write a story using contractions on the back of your paper.
Instructional Strategies (contractions indicate speech)

Attitude OrientationYou probably already use contractions more than you realize. What are some common phrases that use contractions? (example: Don’t do that!) Put up a word card that says “contraction.” This will help Erica see the word I keep using. She will know how to spell it, and when she sees it in the future, she will remember this lesson.

Tell objective: “Today, are going to see how many contractions we can make. At the end, you’ll have to show me you can make contractions, so pay attention!”
Schema Orientation:
Invite students to come sit on the rug. Let Erica sit in the back of the group where she can sit on her knees or wiggle a little bit and not get in anybody’s way. Because she is a high energy student, this will help her be comfortable even though she has to pay attention to the lesson.
There are times when we do not want to say two whole words, so we shorten them and make a contraction.
Explain definition of contraction (making two words into one). Refer to the word cards to reinforce the new vocabulary.
Explain that an apostrophe (takes the place of missing letters) is used to shorten the words. Put up another word card that says “apostrophe.”
Let’s go over some of the most common contractions and see what they mean. Place word card pairs on the board. State two words and see if students can name the contraction before you put the card on the board. Have them think about the answer for a few seconds and then call on someone to give their answer. Instead of going over these common contractions orally, allow students to see the word cards. This will be especially helpful for ELL students like Erica. Be sure to give enough time for Erica to think. Since she is an ELL student she may need the extra time to think about it and make sure she knows how to communicate it effectively. By writing these on the board, Erica can see how they come together; she can see the pattern that the apostrophe takes place of missing letters.
Now let’s see if we can find some in this paragraph. Read the paragraph out loud (taking turns reading aloud). This will help Erica stay with the group when reading and help her hear how to pronounce the words she may not know how to say. Be sure it is clear how to say the contractions (Helpful for ELL kids).  Have students raise their hands when they think they see/hear a contraction. Then discuss what the contraction means/how to say it without using a contraction.
Now we have a game to play. Contraction Bases: Place signs with contractions around the room. Use the word cards from the beginning of the lesson to help you choose bases. Give students 5 seconds 5 seconds to choose a base to stand by. Then call out a few contractions. Students standing at that contraction base are out. Be sure to review what the contractions mean when you call them (example: can’t means cannot). Students who are out can help you choose the next bases to call.
This game will be especially appealing for high energy students like Erica. They can move around the room within the rules of the game. By adding movement like PE to the required content, Erica will enjoy the activity and be more motivated to participate. She will focus on the base she wants to run to, thus reinforcing the contractions. She can learn contractions while getting out some energy.
Activity:
Model/Explain: Now that we understand contractions, let’s play our game. I have put contraction signs up around the room. By the time I count to 5, find a contraction base to stand by. Don’t move until I start counting. You must be frozen at a base by the time I’m done counting.  
            Check for understanding:
            As you call out words that form contractions (to get student out of the game), check to make sure students know the corresponding contraction. Have students point to the contraction that goes with the set of words.
Then play the game! Have students who are out sit at their desks and be “Freeze Police” that make sure everyone is at a base when you get to 5. You can also have students help choose the base. Start over after calling a few bases to let everyone participate. When students get out, they can help you choose a contraction to call. By letting Erica help choose a contraction when she gets out, she will have to find the contraction pair that goes with the one she picked. This can be a type of informal assessment and a way to keep her involved even though she can’t run from base to base.
Independent practice:
Have students go back to their worksheet and ask students to write the contraction that goes with each set of words. This assessment reinforces the content just taught. By having the words printed, Erica can more easily connect it to the word cards and bases signs we just used. Remind them about the fast finisher (write a story using contractions on the back of your paper). Be sure to give Erica and the other ELL students enough time to complete the worksheet. Be patient and encourage the other students to do the fast finisher so Erica has ample time to do the work.
Closure: Lead a class discussion about why people use contractions. When would you choose to use a contraction over a formal set of words?  
Accommodations
            Visual learners- word cards (ELL)
            Kinesthetic learners- active game (Erica’s high energy)
            ELL students- word cards with oral language (ELL)
           
Resources
Word cards
Large writing paper
Markers
Easel
Signs for game
Worksheet
Reflection
Step 1: (Instruction and Management) What went well? What should be improved?
Step 2: (Student Learning) What did the children learn? How do you know?
Step 3: (INTASC and/or Moral Dimensions) Make a connection to INTASC and/or a Moral Dimension.

Bloom’s Taxonomy: Questioning

I know you’ve all learned about Bloom’s Taxonomy. But, if you’re like me, all you remember is that it involves different levels of thinking and questioning. Well, here’s a helpful review if you’re fuzzy on the different questioning types within Bloom’s Taxonomy. 

Discuss the following questions after reading Little Red Riding Hood:

Knowledge
List the items Little Red Riding Hood carries with her.
Name the characters in the story.
Match the character with their items (example: grandma with nightgown, Little Red with basket)

Comprehension 
Explain why the Wolf came to the grandma’s house.
Describe the forest Little Red Riding Hood walked through.
Organize the events of the story to be in order.

Application
Demonstrate how the Wolf would disguise himself if he came to your house.
Model how Little Red Riding Hood responded when she saw the Wolf in the grandma’ s bed.
Translate the wolf’s actions into words. What does he mean when he glares at Little Red Riding Hood?

Analysis 
Compare this story to reality. What events could not really happen?
Diagram the grandma’s house.
Summarize the plot.

Synthesis
Propose how the story would be different if it were Little Red Riding Hood and the Dolphin instead of Little Red Riding Hood and the Wolf.
Elaborate on why Little Red Riding Hood went to visit the grandma.
Design the outside of the grandma’s house

Evaluation
Judge whether the wolf was good or bad. Defend your opinion.
Recommend another way Little Red Riding Hood could have reacted when she met the wolf in the woods.
Defend the wolf’s actions.

Notice how the levels increase in difficulty? Try throwing in some higher levels of Blooms Taxonomy next time you’re creating a test or just discussing your guided reading book.

Teaching PE: Helpful Visuals

Teaching PE requires a ton of management. You’ve got kids running around, balls flying past you and you’re trying to remain sane. Just as in the regular classroom, it is helpful to have some ground rules and procedures in place. I made these signs, printed them on 11″ x 17″ paper and laminated them. Then I attached a strip of paper (also laminated) to the back so these signs could slip over a big orange cone and be referred to easily. I put the “consequences” sign on a cone in a corner of the gym and used that corner as a time-out spot. (I know may think time-outs are lame, but it’s an effective way to let students know what’s acceptable in your PE class.) Use these or make your own. They really help!

Puppets? In the Classroom?

Although many might only associate puppets with entertainment, puppets can be a great classroom management tool. There are many uses of puppets in elementary school classrooms.  The following are some of the ways puppets can be used in the classroom:

  1. Puppets can ask students questions to check for understanding. The puppet can ask questions that students can answer. The teacher can also ask puppets questions (the puppet will always be wrong) and students can correct the puppet to demonstrate understanding.
  2. Puppets can help shy or timid children participate. A child puppeteer might feel safe “behind” a puppet. The puppet will be one “talking” and the student my feel less scared to share thoughts through a puppet.
  3. Puppets can discuss things in a non-threatening way, since they are a third party. If there are conflicts or intimidating discussion topics, the teacher can use puppets. Puppets are not threatening, so they can help bring down anxiety within students.
  4. Puppets can encourage enthusiasm, or be the class mascot. Puppets can be silly or overly enthusiastic, while still maintaining the dignity of the actual teacher.
  5. Puppets can serve as cheerleaders to encourage students.
  6. Puppets can get student’s attention to make announcements such as homework, changes in daily routine, and birthdays (as well as lead the birthday song!).
  7. Puppets can ask bold questions that the students want answers to, but might not want to ask. For example, an introduction of the class restroom policy might sound like this:
Puppet: What do I do f I have to go to the bathroom?
Teacher: Well you can raise our restroom card quietly and I will see you.
Puppet: Why can’t I just ask you out loud?
Teacher: That can disrupt the class and disturb others who are working. I will nod to let you know you may go.
Puppet: Oh, okay. So I should quietly raise my bathroom card and you’ll see me and nod that I can go?
Teacher: Yup! You got it!
Puppets can be an effective tool to manage a classroom. Puppets can keep students entertained and can take some of the pressure off of the teacher and allow the teacher some room for fun and creativity.

Theater Games!

One of the best ways to break the ice when trying to encourage students to stand up in front of their peers is playing a game first. There are gobs of theater games out there, but this one is one of my favorites…

Theater Game: Who am I?
Description: A student is sent out of the classroom (or at least out of earshot) and when they return, they must interact with other students until they know the famous person or occupation the class has chosen for them.
Connections to other content areas:
History: choose famous people from history
Science: choose scientific careers (doctors, optometrists, field researchers, zoo keepers), or people who have made famous discoveries
English: choose prominent characters from literature (especially books you have read in class)