I loved these fun Christmas tree craft ideas for kids! Click on the image to see the original post:

No source available


I loved these fun Christmas tree craft ideas for kids! Click on the image to see the original post:
No source available
Yay for holiday crafts! Here are some good ones…
1. Paper Plate Santa
 Cut out the center of a paper plate, attach cotton balls for a beard and construction paper for a hat. I love this Santa craft because your children get to be the face of Santa! (source)
2. Q-Tip Snowman Painting

I hate cleaning paint brushes, so this craft project totally speaks to me. Paint everything by dabbing paint-dipped Q-tips. it makes super cute snowflakes! And when you’re done, just throw away the “brushes!” (source)
3. Thumb print string of lights

Using your sharpie, draw a string for your lights on your paper. Then have kids stamp their thumb in different colors all along the light string and allow to dry. When it dries, draw a squiggly for the light bulb base with a permanent marker. (source)
I saw these holiday craft and activity ideas recently and just HAD to share them with you!
1. Snowman Slam Bowling

To make our snowmen, decorate six white cups using black and orange craft foam. To make the snowballs, tightly ball up three white socks. Now, you’re all set up for some fun miniature bowling! (source)
2. Bird Food Ornament
 To make these cute candy canes, first thread a red pipe cleaner through O-shaped cereal. Then hang it on your trees or bushes outside to spread the holiday cheer! Your kids will have fun making them and watching the birds snack on them!
3. Paper Bag Gingerbread House
 My family makes gingerbread houses every year. So, I’m pretty much gingerbread-house obsessed. And, when I saw this idea, I went nuts! (I couldn’t find the original posting of this; so, if it’s yours, please tell me so I can give you credit!) Give each kid a brown paper bag. Then show them how to fold the top and glue some paper to the fold (making a roof) and let them go crazy with construction paper. Pretty easy, so many creative possibilities and best of all, it’s completely healthy (although it’s not as yummy)!
December is my favorite month. By far. If’s full of the best holidays of the entire year! And there are so many cute kids crafts for Christmas, Hanukkah, and winter. Here are some of my favorites:
1. Melted Snowman
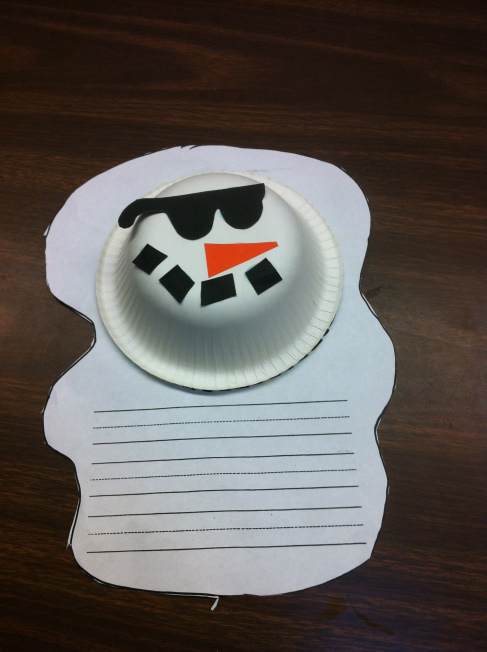

Santa Barbara Snowman: This activity was easy-peasy and made a neat and funny craft. Living in sunny Southern California, we don’t really have opportunities to make snowmen, so using a simple pre-printed sheet with the outline of a puddle and an overturned paper bowl the kids made their own melty, sunshine snowmen. They put the usual accessories on, with the exception of the sunglasses, and then wrote a sentence about where their snowman should move to or what happened to him. A lot of bang for the buck. (source)
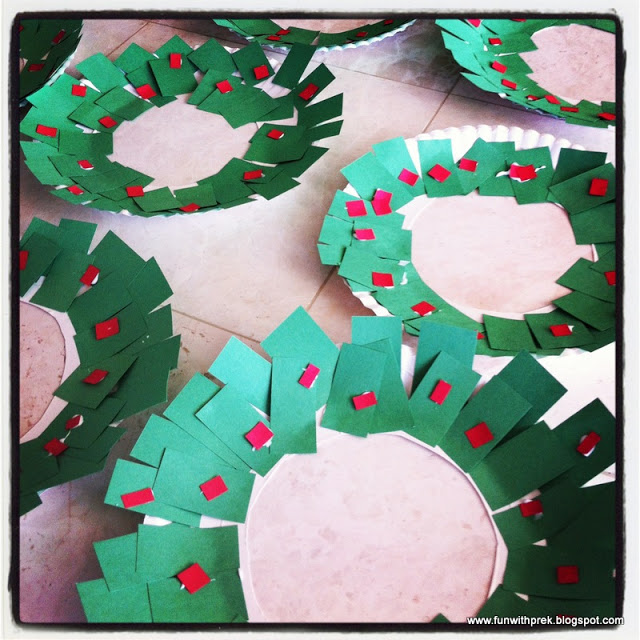
2. Paper Plate Wreaths

Here’s a fun activity to use in a unit on symmetry or during a discussion of story setting (since lots of holiday stories take place at a gingerbread house!). Print off one page for each student and have them finish the rest of the picture. Make sure to help students focus on whatever aspect you’re learning about (symmetry, setting description, etc). You could extend this activity further by turning it into a writing project. …Or just color it and have fun! Here’s the free printable PDF: Finish the Drawing- Christmas 1 Happy holidays & Merry Christmas!
Click here for more fun and free Christmas/Winter stuff for kids!
I absolutely love the paint section at Lowe’s. The colors are just so fun! So when I saw the swatches, I just had to grab some and turn them into a craft. And here’s what I came up with (just in time for Thanksgiving!):

It was super simple so you can do it with even young kids and it didn’t take very long. You’ll need some paint swatches, brown construction paper, scissors and glue or tape. First, I trimmed off the part of the swatch that says the paint name. I recycled those pieces so they wouldn’t accidentally end up on my turkey. I used a paper cutter, but students can use scissors, since it’s not very much cutting.
Then I made strips by cutting the remaining parts of the swatch. Depending on the original size of the swatch, you’ll end up with more or less strips (or feathers). I’d have kids each cut up 1 or 2 swatches and then share the resulting feathers with kids around them so everyone ends up with a variety of colors.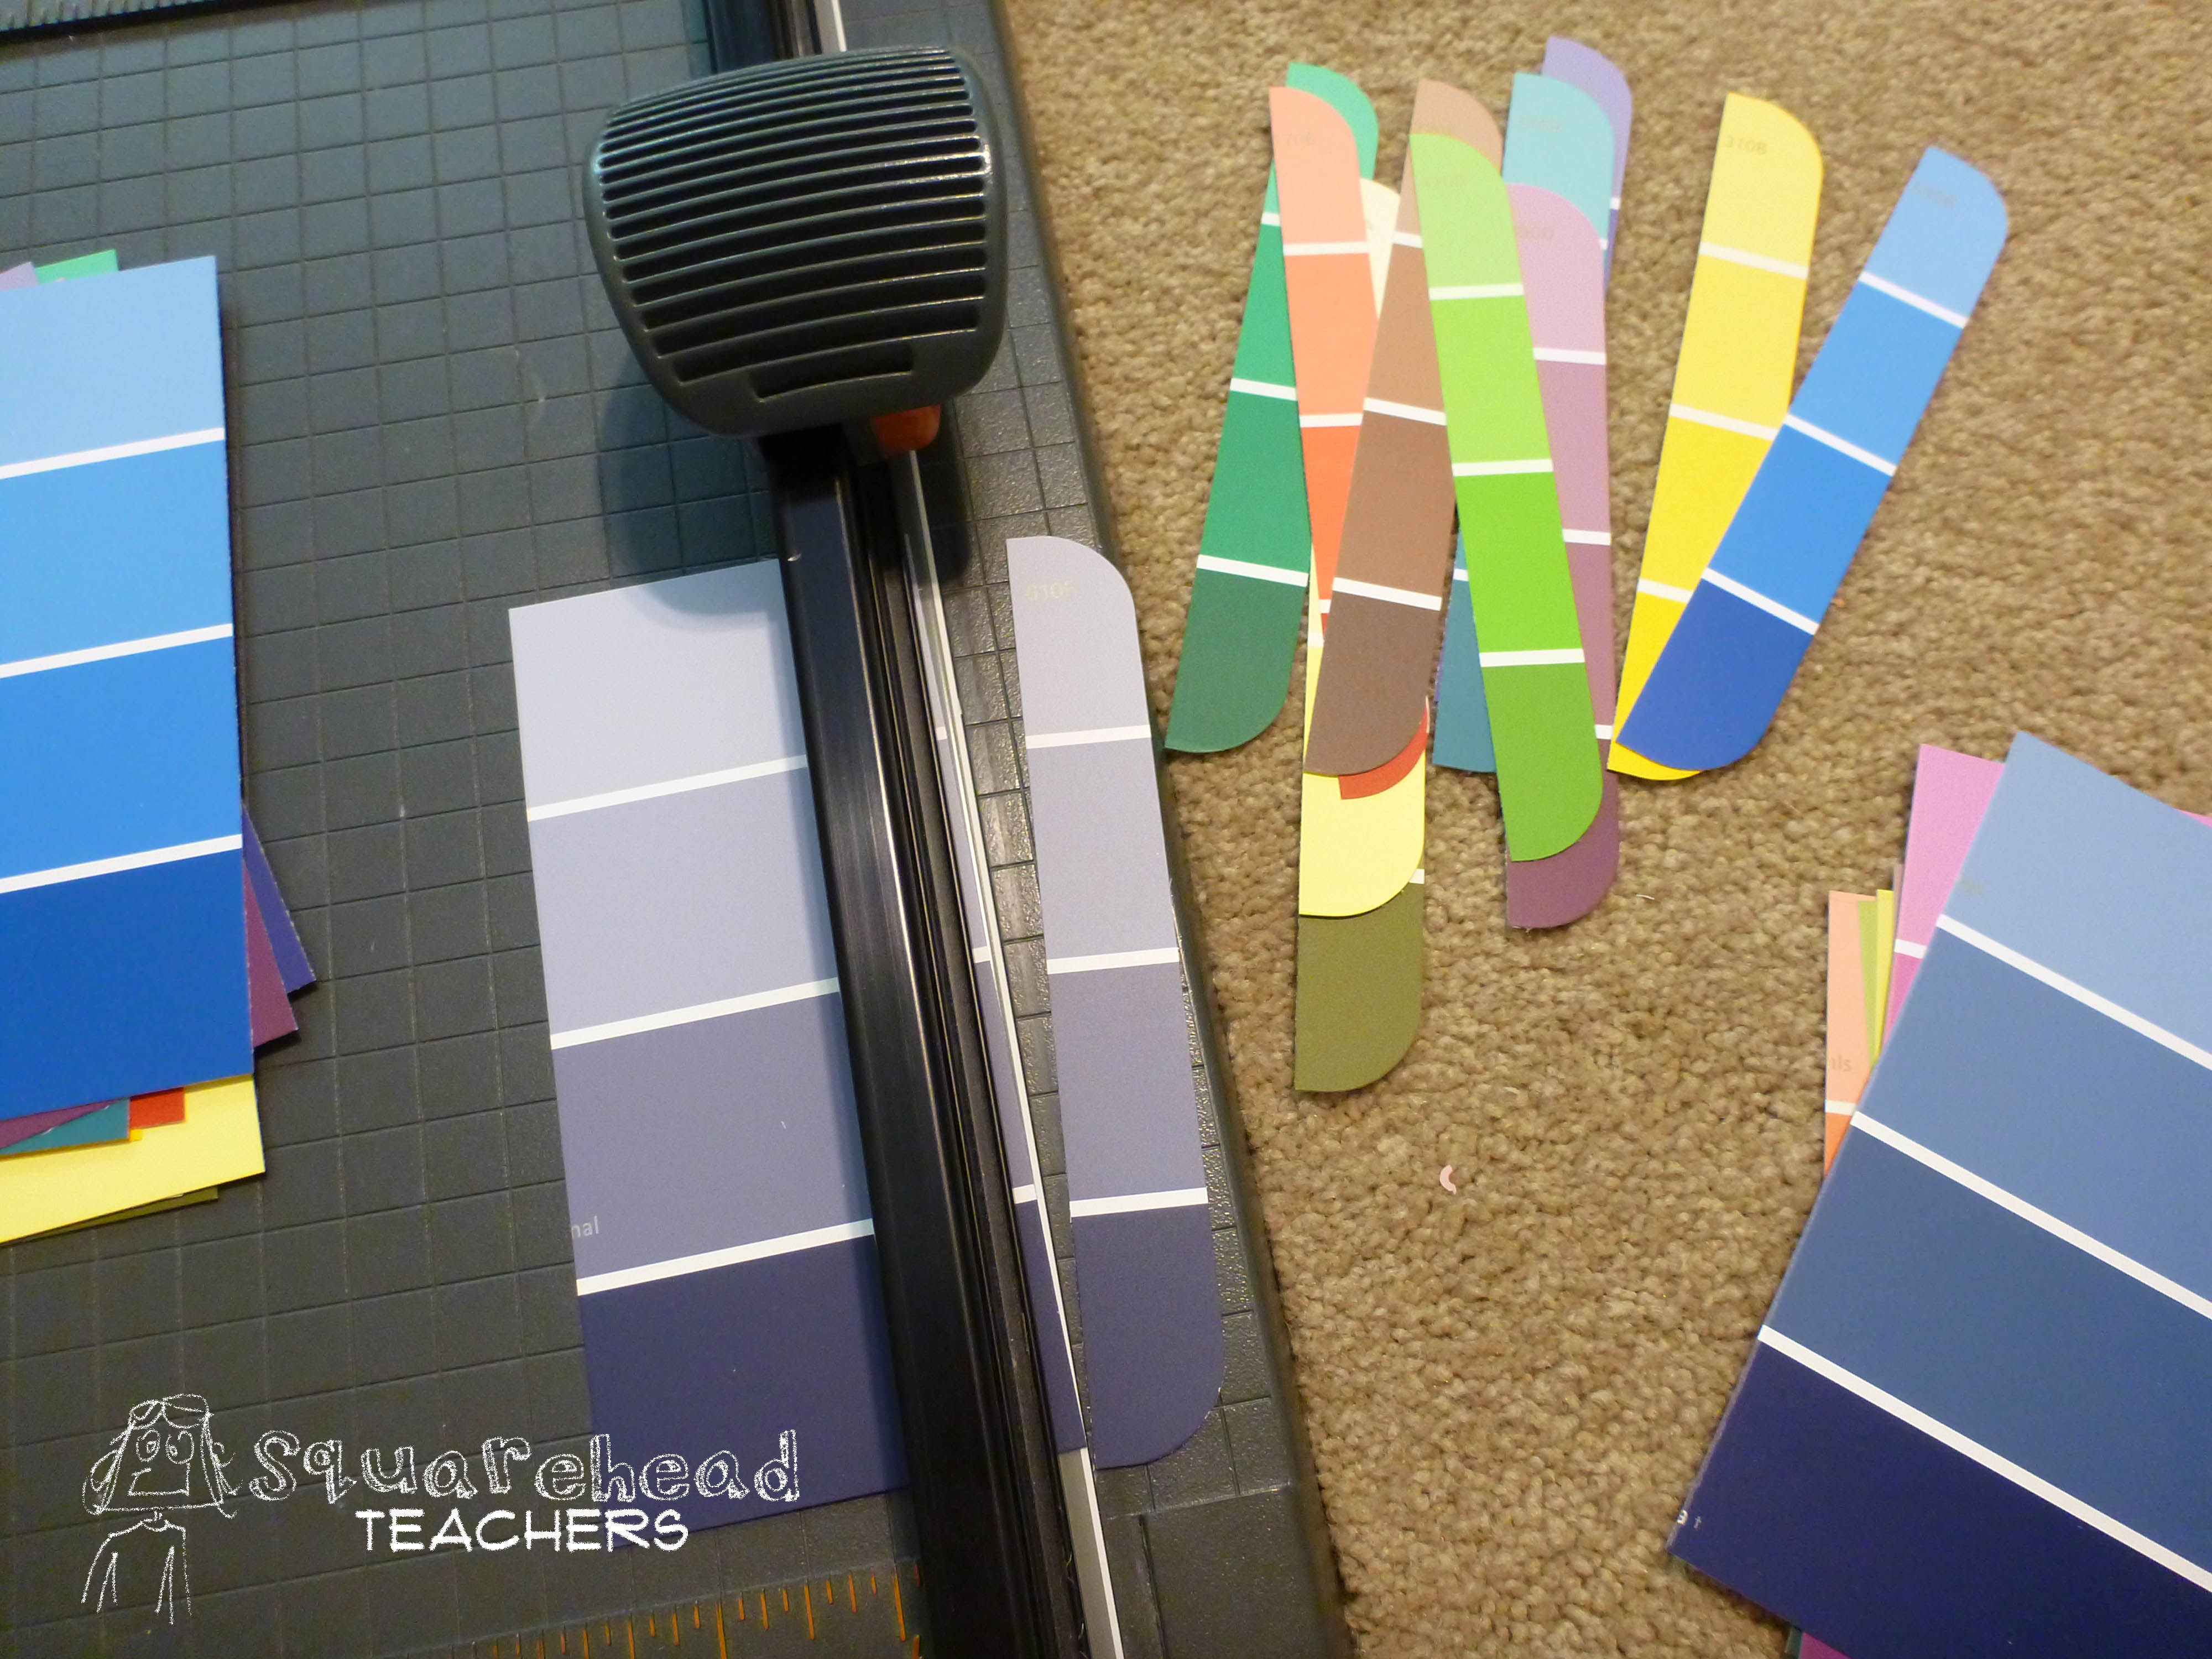
Then I cut out the shape of a turkey’s body. This is part of the fun (ending up with different sized/shaped bodies) so just have your kids make their own if they’re old enough. If they need some guidance, have them draw a small circle on top of a bigger circle (kind of like a snowman) and then cut out the outside only.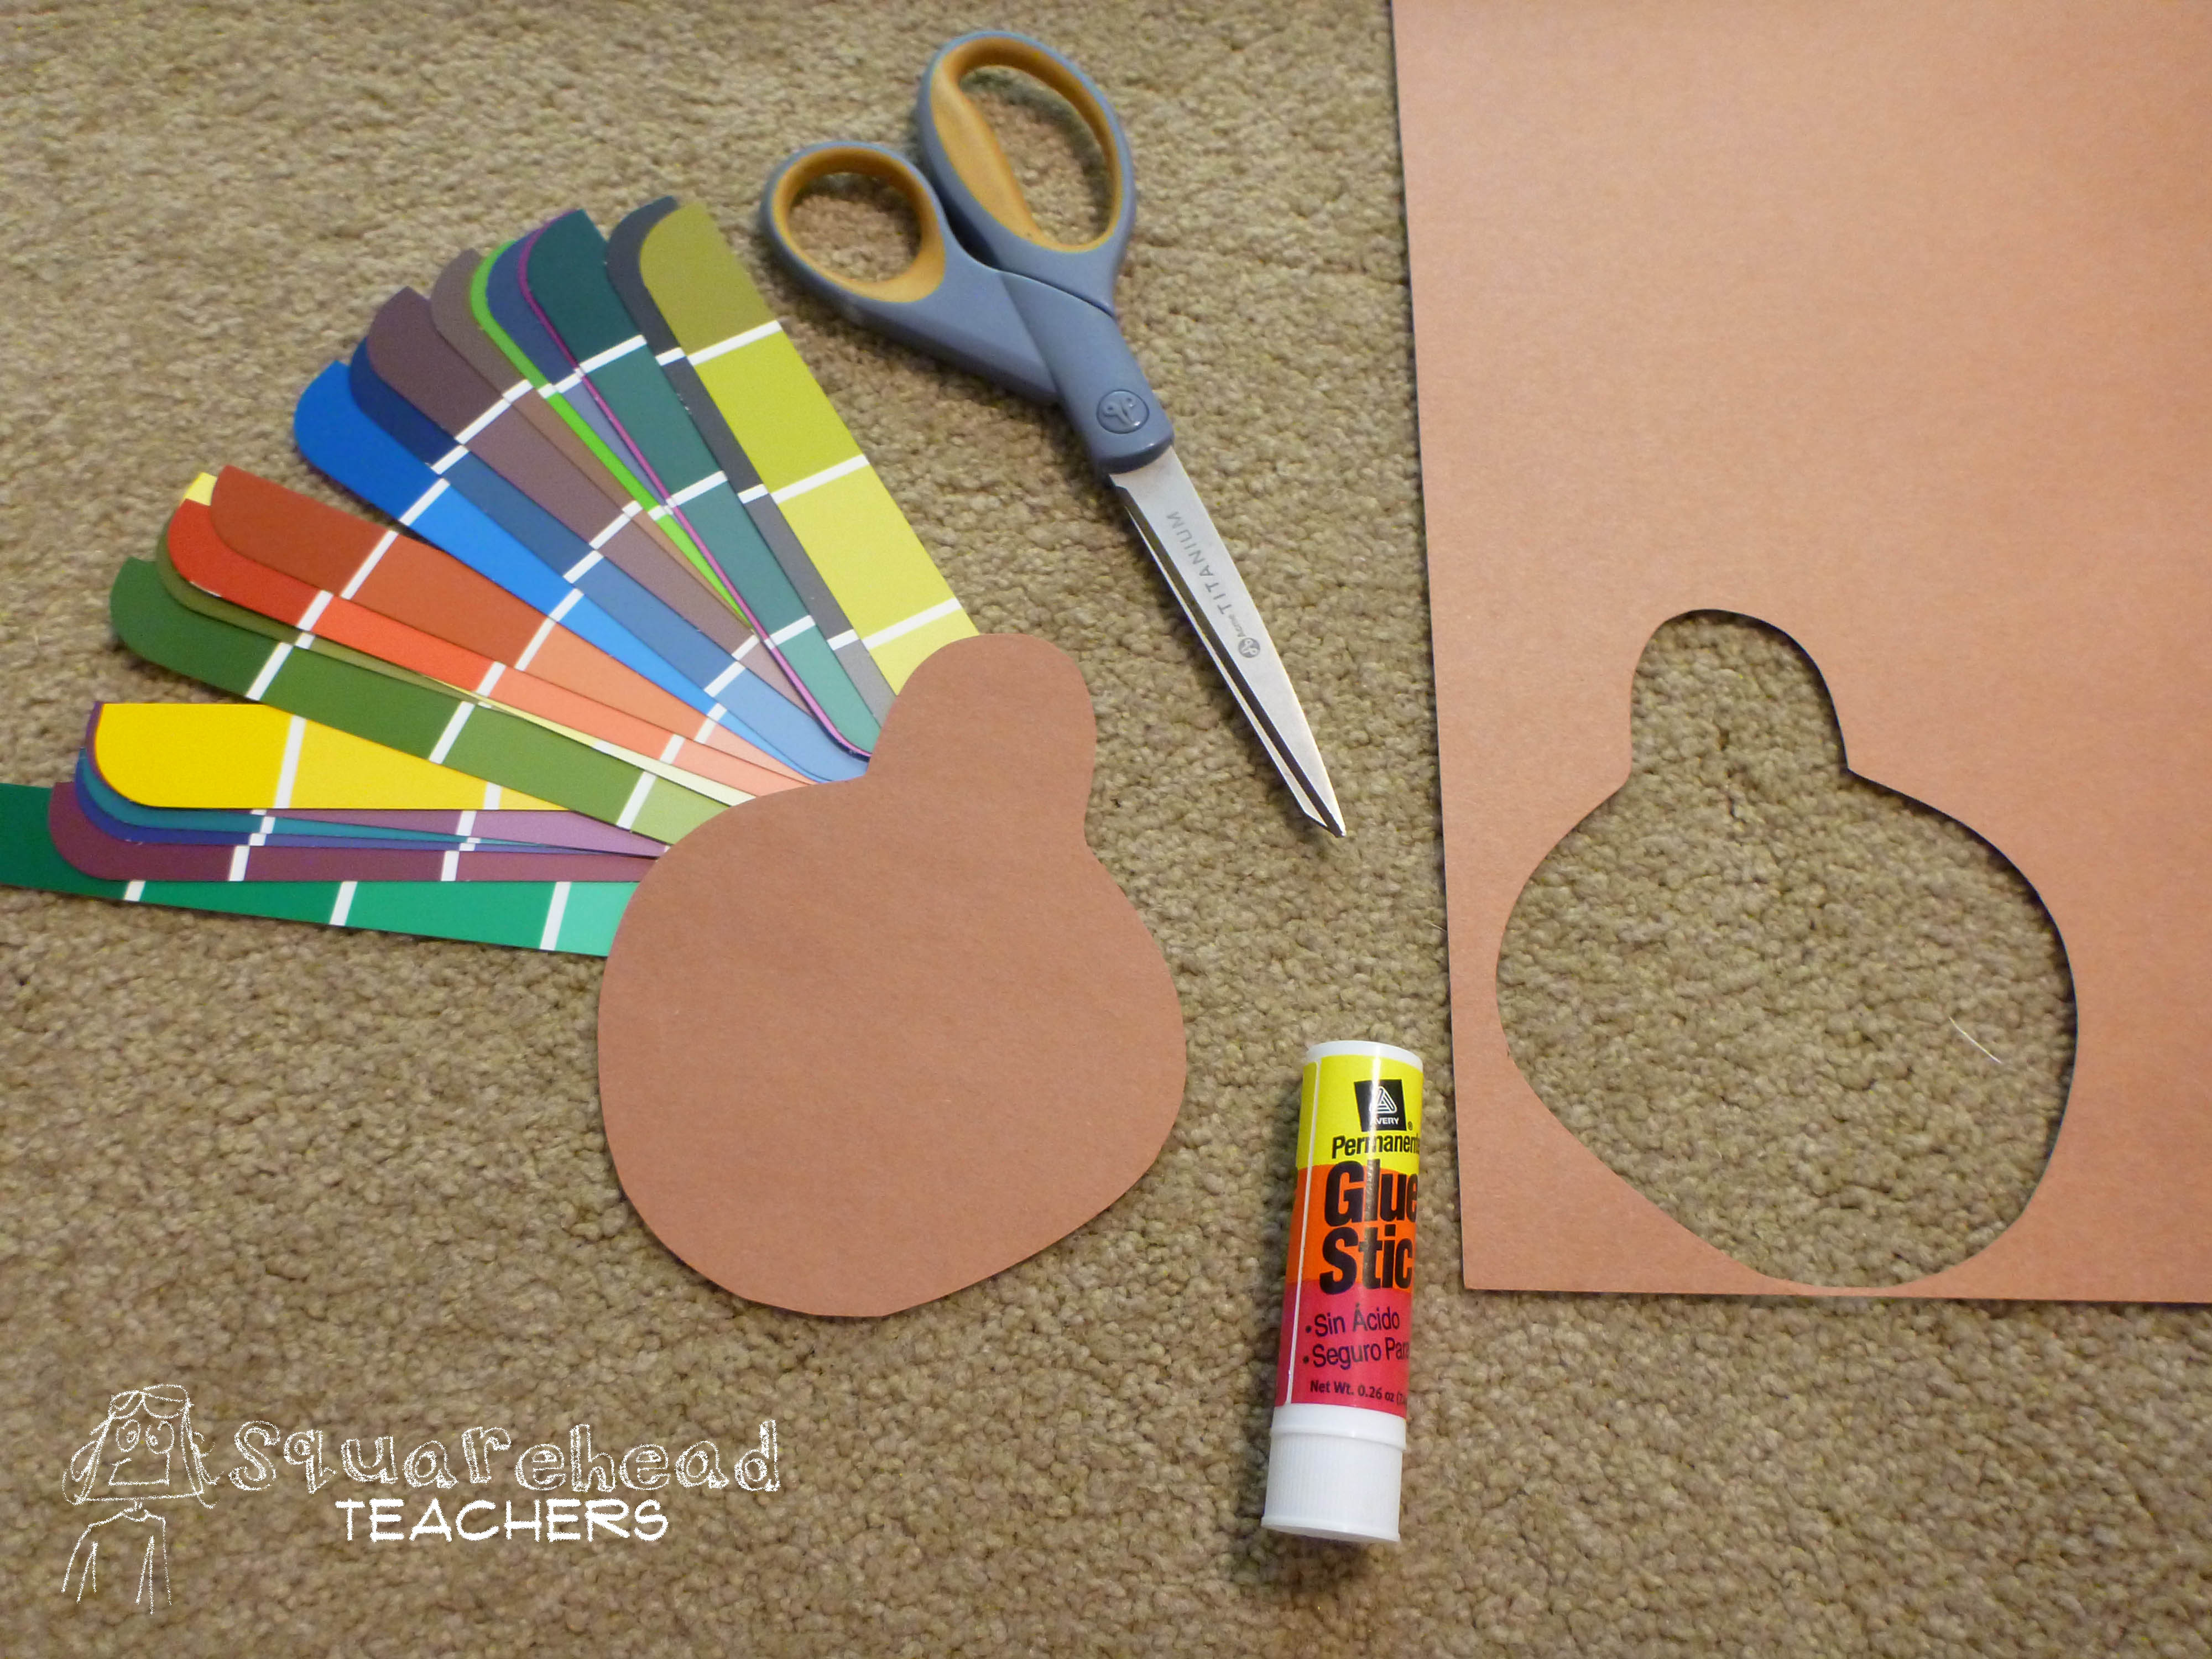
Then attach the feathers together (in groups of 4 or 5 feathers each) at the bottom using tape or glue. Tape’s faster, but glue works too. Once you’ve attached a few feathers together, stick them to the back of the turkey. Keep doing this until you feel you’ve got enough feathers. 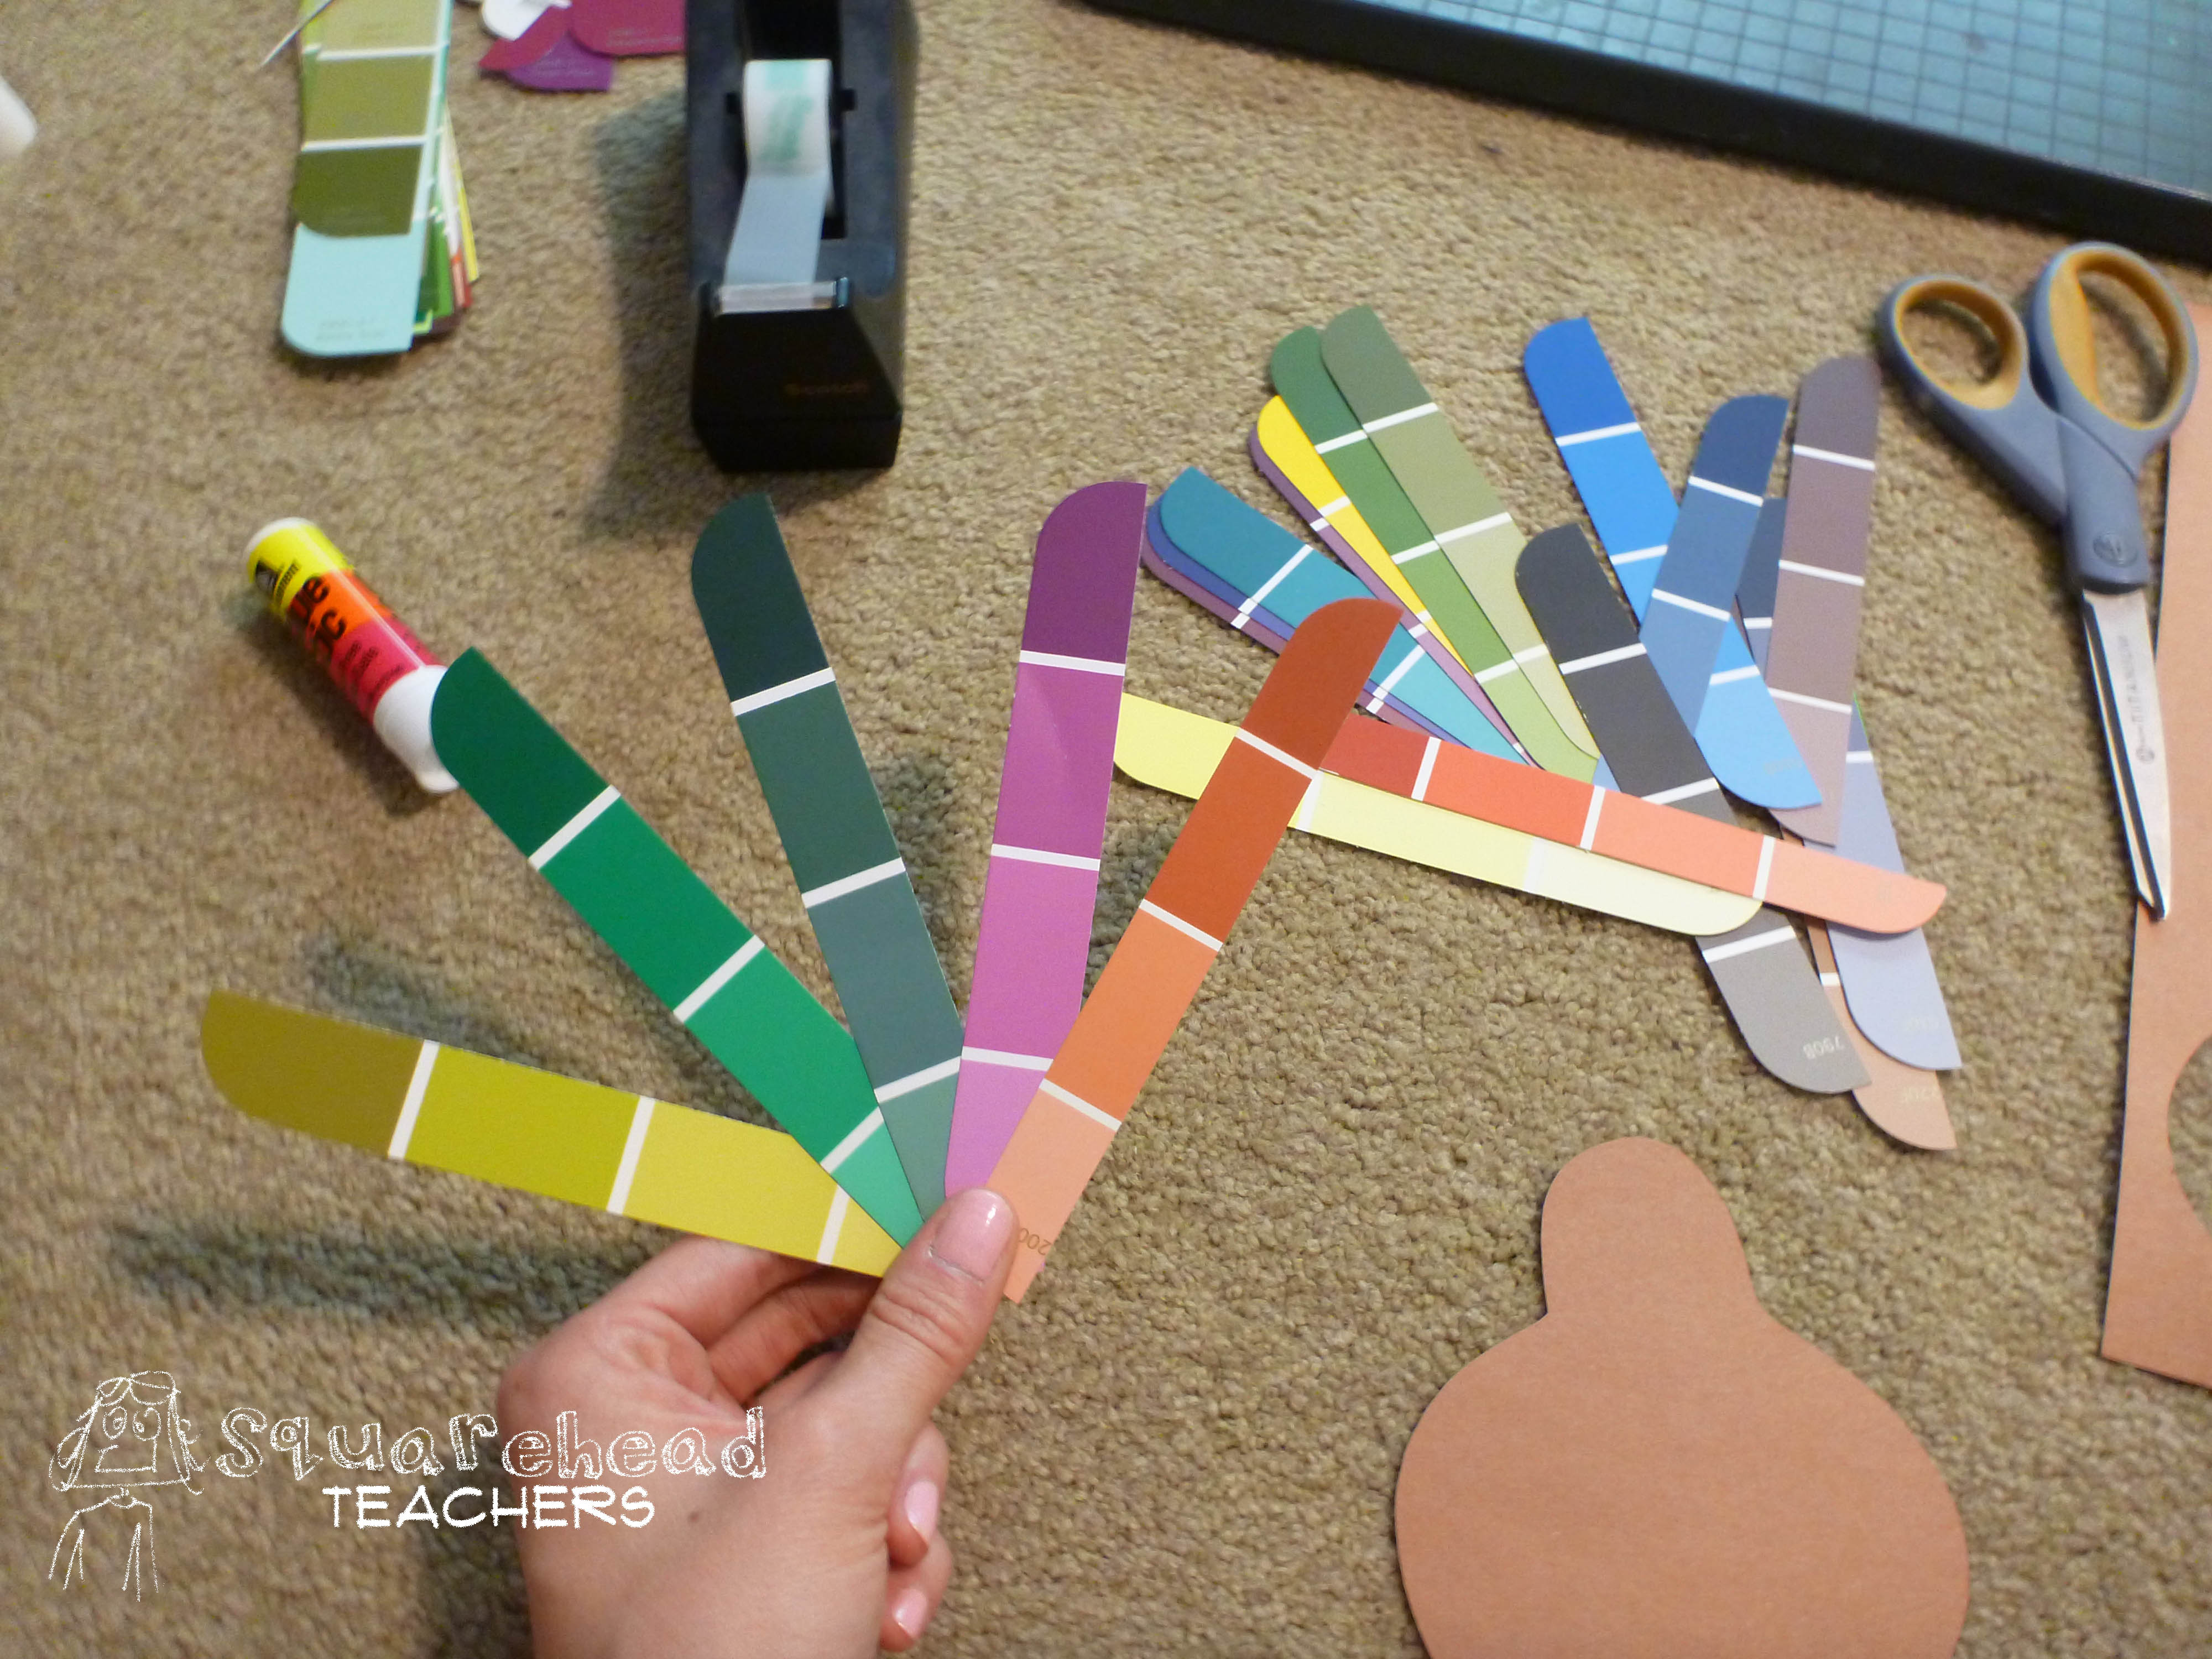
Then draw a beak, eyes and wings on your turkey and add some legs with the remaining brown construction paper. And that’s it. Easy-peasy Thanksgiving craft for kids!
If you’re looking for extensions for this craft, have your kids make a graph showing how many blue feathers, green feathers, red feathers, etc. are on their turkey or at their table. Have your students write a character description of their turkey or use spelling/vocabulary words in a story about their turkey. But whatever you do, have a great Thanksgiving!

There are always kids in preschool and kindergarten who need a little extra practice using scissors. So here’s a perfect activity… making an adorable paper hedgehog! Click here to see the tutorial.

I saw this cute “Thankful Pumpkin” paper craft idea (source) and wanted to make some printables to go with it. I love the idea of helping kids remember what they’re thankful for. Activities like this are perfect opportunities to talk with kids about how blessed we really are!
Materials:
2 Sheets of Cardstock (to print these printables on: Thankful Pumpkin Printable)
Small Hole Punch
2 Brads
Green Construction Paper
Brown Pipe Cleaner
Directions
1. After you print the two printable pages, cut them into strips (cut on the lines).
2. Finish writing the “I am thankful for” phrases on 5 strips of cardstock.
3. Decorate the “Happy Thanksgiving” on the other 5 strips. Get Creative!
4. Make a small hole in the center of both ends of each strip. (Use small hole puncher or another tool to make the small holes.)
5. Stack the paper strips alternating the “I am thankful” and “Happy Thanksgiving”.
6. Stick the prongs of a brad through the holes on one end of the stack with the metal circle of the brad resting on the side with the writing. Secure Brad.
7. Fan out the slips with the writing side facing the table.
8. Pull up one strip and feed the prongs of the 2nd brad through the hole with the metal circle resting on the blank side of the strips. Continue putting strips on brad going in a circular pattern.
9. When all of the strips are on the brad and you have formed a ball, secure the brad by pushing the prongs down in opposite directions.
10. Cut 2 leaf shapes from the green construction paper. Poke a small hole at bottom of each leaf.
11. Wrap the brown pipe cleaner around a pencil to make a spiral shape. Gently slide the pipe cleaner off to keep spiral shape.
12. Lift up the prongs of brad, hold brad in place from below, and slide on leaves.
13. Place brown pipe cleaner next to prongs, push prongs down on top of pipe cleaner to securely attach the leaves and “stem”.
Here’s what it looked like when my friend tried it with her class:

Click here for more fun and free Thanksgiving stuff for kids!
