2 Easy April Fools Day Ideas for Teachers

Easy Idea submitted by a teacher friend in AZ:

“I went to school today with straight hair (I always curl my hair), and wore clothes that I had never worn to school.  I also wore tallish sandals which I don’t wear to school.  When I went to pick up my second grade kids from the playground to start the day, I had my teaching partner introduce me to my class as my twin sister, the substitute for the day.  It was pretty fun.  I acted like I didn’t know their names, the routine, etc.  After a half hour, most of the kids were  believing that I was my sister.  It was pretty funny.  I finally told them April Fool’s Day after a couple of hours, when 2 of my kids began arguing about who I was.  The more vocal of the two was defending the position that I was indeed the sister.  They enjoyed the prank!”

A sixth grade neighbor of ours told me about this prank his teacher pulled last year:

His teacher said their class was participating in a contest. He said they all had to write paragraphs about how their class could use I Pads in the classroom.  The teacher told them that the class with the best paragraphs would get I Pads.  So everyone worked diligently on the paragraphs.  On April Fool’s Day, the teacher told them they won and the I Pads were on their desks for them when they walked in the room.  The students were very excited, but moaned as they discovered an eye pad on each desk! Here is an example of the eye pads the teacher handed out.

Happy April Fool’s Day!

Math About Me (free printable)

Kids love writing about themselves. (I know mine do!) Here’s a series of printables that ask the child all kinds of math questions about themselves. I’ve made 3 versions (easy, medium and hard) so you can choose which is most appropriate for your class.

The “easy” version would be appropriate for kinder or first grade. It includes letters, syllables and fact families (single digit addition and subtraction).

The “medium” version would be appropriate for first or second grade. It includes letters, syllables and fact families (single digit addition and subtraction), writing time and feet/inches measurement.

The “hard” version would be appropriate for third grade and up It includes letters, syllables and fact families (single digit addition and subtraction), writing time, calculating elapsed time and feet/inches measurement.

Have a great week! Be sure to check out my other free printables!

Easy Science Project: Life Cycle

A friend of mine sent me this photo and explanation of a simple life cycles project she uses in her kindergarten class. I love that this project is simple, almost zero prep for the teacher (other than gathering everyday supplies) and happens fast enough that the kids don’t lose interest. Here are the steps:

1. Soak lima beans in cold water overnight.

2. Put a lima bean in a moist paper towel.

3. Put the paper towel (containing the lima bean) in a Ziplock bag.

3. Seal bag so water doesn’t evaporate (kind of like making a terrarium).

5. Staple to the wall (we put ours near a window). Last year in a different classroom we taped it to a window.

6. Students kept a two week log (words and drawing pictures). At the end, send it home!

If you’re got an idea that works well in your classroom, let me know!

Counting Coins Worksheet

Long time, no see! I’ve got another free worksheet for you. This time it’s a coin counting practice page. It’s appropriate for 1st or 2nd grade. I’ve included an answer key, so be sure to download that too. Click the “download” button below the worksheet to access it. Enjoy!

Paper Plate Hat: Cat in the Hat (Dr. Seuss)

Happy Read Across America Week! (What would we do without Dr. Seuss?! Such creativity from one person!) My kids needed a quick Cat in the Hat costume for school and I didn’t have much time. I came up with this simple paper plate hat and it took me about 3 minutes. I’m pretty pleased with how it turned out. It would be easy to have my class make them!

Supplies:

  • White paper plate (I used uncoated, but I’m guessing the coated would work as well. I would not use Styrofoam.)
  • Red marker
  • Scissors
  • Tape (I used packing tape, but Scotch tape would work too.)

Steps:

  1. Cut the paper plate as shown below. Consider cutting a small hole to get each kid started (or if you teach younger kids, cut them out ahead of time and just let them color the stripes.)

2. Color 3 red stripes as shown below.

3. Turn the paper plate over and reinforce the fold with a small piece of tape. Without the tape, my son’s hat started to tear when he pulled it down on his head too hard. After we put the tape, it was just fine.

4. Fold the center piece up gently.

Note: you may need to cut more off (making the brim more narrow) if you’ve got larger heads you’re making this craft for. But overall, it was so simple and it turned out great. Enjoy!

Build A Jack-o-Lantern Race (Low Prep Halloween Math Facts Game)

This game can be used to practice any kind of math facts (addition, subtraction, multiplication, division) or really any content where the kids have to provide a specific answer (teacher asks a question, students provide a short responds). I don’t recommend this will spelling though, because it will be hard to hear 3 kids spelling the same word all at the same time and know who got it right. Here’s the game:

Prep:

  1. Cut out paper pieces for each team: orange pumpkin shape, 2 eyes, a mouth, a nose
  2. Need glue to assemble the team pumpkin
  3. Tell your students a day or two beforehand that they will do a game using multiplication facts

Goal

Be the first team to build your jack-o-lantern by answering multiplication facts correctly the fastest!

Play

  1. Divide the class into two or 3 teams (more teams means each kid practices more facts).
  2. (Round 1) Each team sends a representative up to the front to compete against each other to answer multiplication facts for the first round. Teams may not help.  Hold up a flash card, whoever answers the fact correctly first a point in the round (keep track of how many each team answered). Do 5 facts for the round, and do a tie breaker if needed.
  3. Whichever team has the most points at the end of the round, chooses a piece for their jack-o-lantern.  Only 1 team will get a piece each round.
  4. (Round 2) different representatives compete to earn another pumpkin piece for their team. You can do the same or different math facts, because it will be different kids answering. Again, teams may not help.
  5. Whichever team has the most points at the end of the round, chooses a piece for their pumpkin. 
  6. Continue having rounds of multiplication facts until one team wins.

Adaptation for last-minute play:

Instead of doing pumpkin pieces and building a jack-o-lantern, write Halloween themed word, like “ghost” or “witch” on the board once for each team (or, if you want the game to be long, write “Halloween”). Circle letters in the word every time you would have given a pumpkin piece to the team that won the round. This cuts out the prep for the teacher, but I don’t think it’s as fun for the kids. They seem to like getting to walk back to their seat with a piece for their team.

What other low prep Halloween activities have you tried that incorporate math facts?

Don’t Eat Pete Game Template


Don’t Eat Pete is one of my family’s favorite games. It’s also been a favorite in my classroom! Since so many people have been sheltering-in-place because of the coronavirus, my mom (and former teacher herself) had the genius idea to make Don’t Eat Pete kits to drop off to local families with kids. She made each family a game board (or included stickers so the kids could decorate it themselves) and also included candies to use to play the game. (Click here or here to read my posts on how to play.)

So, here’s the template and you can let your kids decorate their own board! Crayons, stickers, markers, glitter*, paint* or colored pencil, just let your kids get creative!

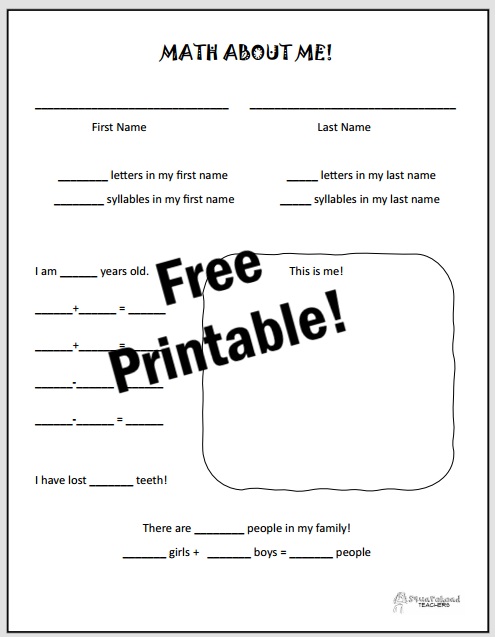
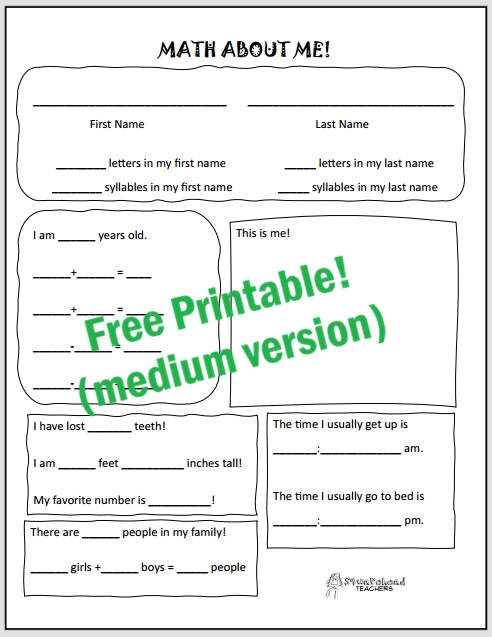
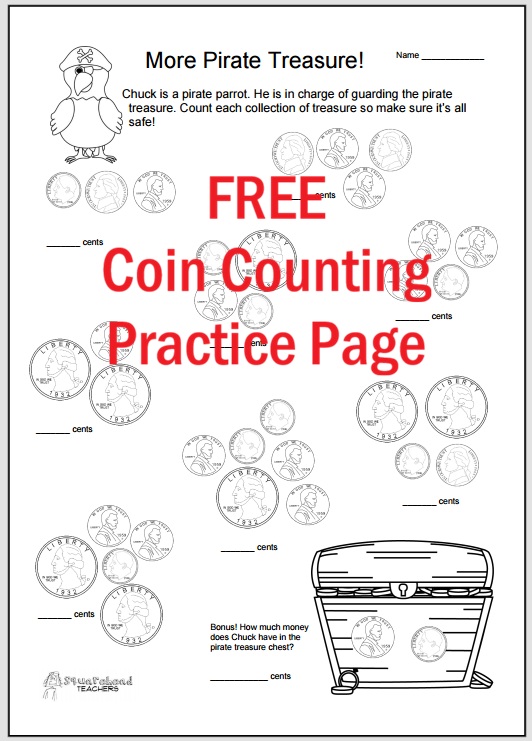
Click here to download the PDF:  Don’t Eat Pete – game template

*If you use craft supplies like these, I suggest putting the board in a page protector sleeve if you’ll be playing with something edible.

Click here to check out my other Don’t Eat Pete boards to download.


Easy Die Cut “Don’t Eat Pete” Board

This site contains affiliate links to products. We may receive a commission for purchases made through these links.

I’ve written about Don’t Eat Pete before (How to play, How to play/easy Valentine’s board and St. Patrick’s Day board), but I just love this game and it’s perfect for any holiday. Seriously, I played it at every single classroom party (as a kid since my mom was often the Room Mom and again as a teacher) because it just continues to be a kid favorite… the there’s hardly ANY prep involved!!

But if you’re that teacher who wants to make something once and never have to worry about it again, here’s a post for you. My mom made this style of Don’t Eat Pete board for each holiday and then all she ever had to do was buy the candy, cereal or snack she was going to use for the game.

Step 1 – choose 9 die cuts from your school’s Halloween collection. If your school doesn’t have die cuts and you don’t want to head down to the district office to do it, just wing it and cut some simple shapes yourself. Cut them out of colored construction paper (Be careful which construction paper pack you get! one I recently purchased from Amazon didn’t include purple! Here’s a small low-priced pack that has all the basic colors!)

Step 2 – Lay them out 3 across in 3 rows on big construction paper (here’s a low-priced pack) and place small strips of construction paper between them to form a grid. If you’re in a pinch, just draw in lines using a sharpie or other permanent marker (here are some awesome metallic ones that work great for writing on black!)

Step 3 – Write numbers on each shape. This just makes it easier to remember which one is “Pete” for that round. You can also silently remind your kids by holding up fingers.

Step 4 – Laminate the entire thing! Now enjoy!